A Dante/AES50 enabled 4U mixer rack for 8 wireless IEM channels

Today, I write about how I built an 8 channel wireless IEM system in a 4U form factor.

The Past

A couple of years ago, I bought a Sennheiser ew IEM G4 to be used in my Sound Devices Scorpio; my microphone, MIC, rack. With this, I could either receive a single wireless stereo mix or two separate wireless mono mixes which Sennheiser calls “focus mode”. For all other mixes I used four Behringer P16-M personal mixers with wired headphones on my Behringer X32 Rack; my front-of-house, FOH, rack.

Three years later, I wanted to extend the number of wireless channels and have a solution that could be used independently of any rack with either DANTE or AES50.

The Solution

After some thinking back and forth, I decided to do a complete redesign and not use another X32 Rack and not continue to use the P16-M mixers either. Instead, I went for a Midas M32 C with a Midas HUB 4 and four Midas DP-48 personal mixers. All of that would feed four Sennheiser ew IEM G4 transmitters sharing a single transmitting antenna.

Back of wireless IEM rack with DP48 connected to it

The Requirements

To better understand why I chose this setup I list my 15 requirements that had to be met by the new solution:

  1. The new IEM rack and the existing FOH and MIC rack can be separated by more than 50m;
  2. Be able to connect with a single cable to either of the racks;
  3. Minimise re-cabling when using with either FOH or MIC rack;
  4. Be able to extend the IEM rack to use it as a stage mixer;
  5. Be able to connect our 48×40 stage box the IEM rack;
  6. Be able to use all three racks at the same time;
  7. Be able to use up to 4 stereo or 8 mono wireless IEM channels;
  8. Be able to use up to 8 separate personal monitor mixes selectable from at least 16 channels each;
  9. Be able to remotely control personal mixes;
  10. Reduce interference between separate IEM transmitters;
  11. Do not rely on wireless radio transmission in the 2.4GHz or 5GHz band;
  12. Have low latency to be usable for vocals;
  13. Be able to use talkback between talents and sound engineer;
  14. Be able to route talkback from other sources to the personal mixers and wireless IEMs;
  15. Support ambient sound to ease listening with in-ear headphones.

The Build

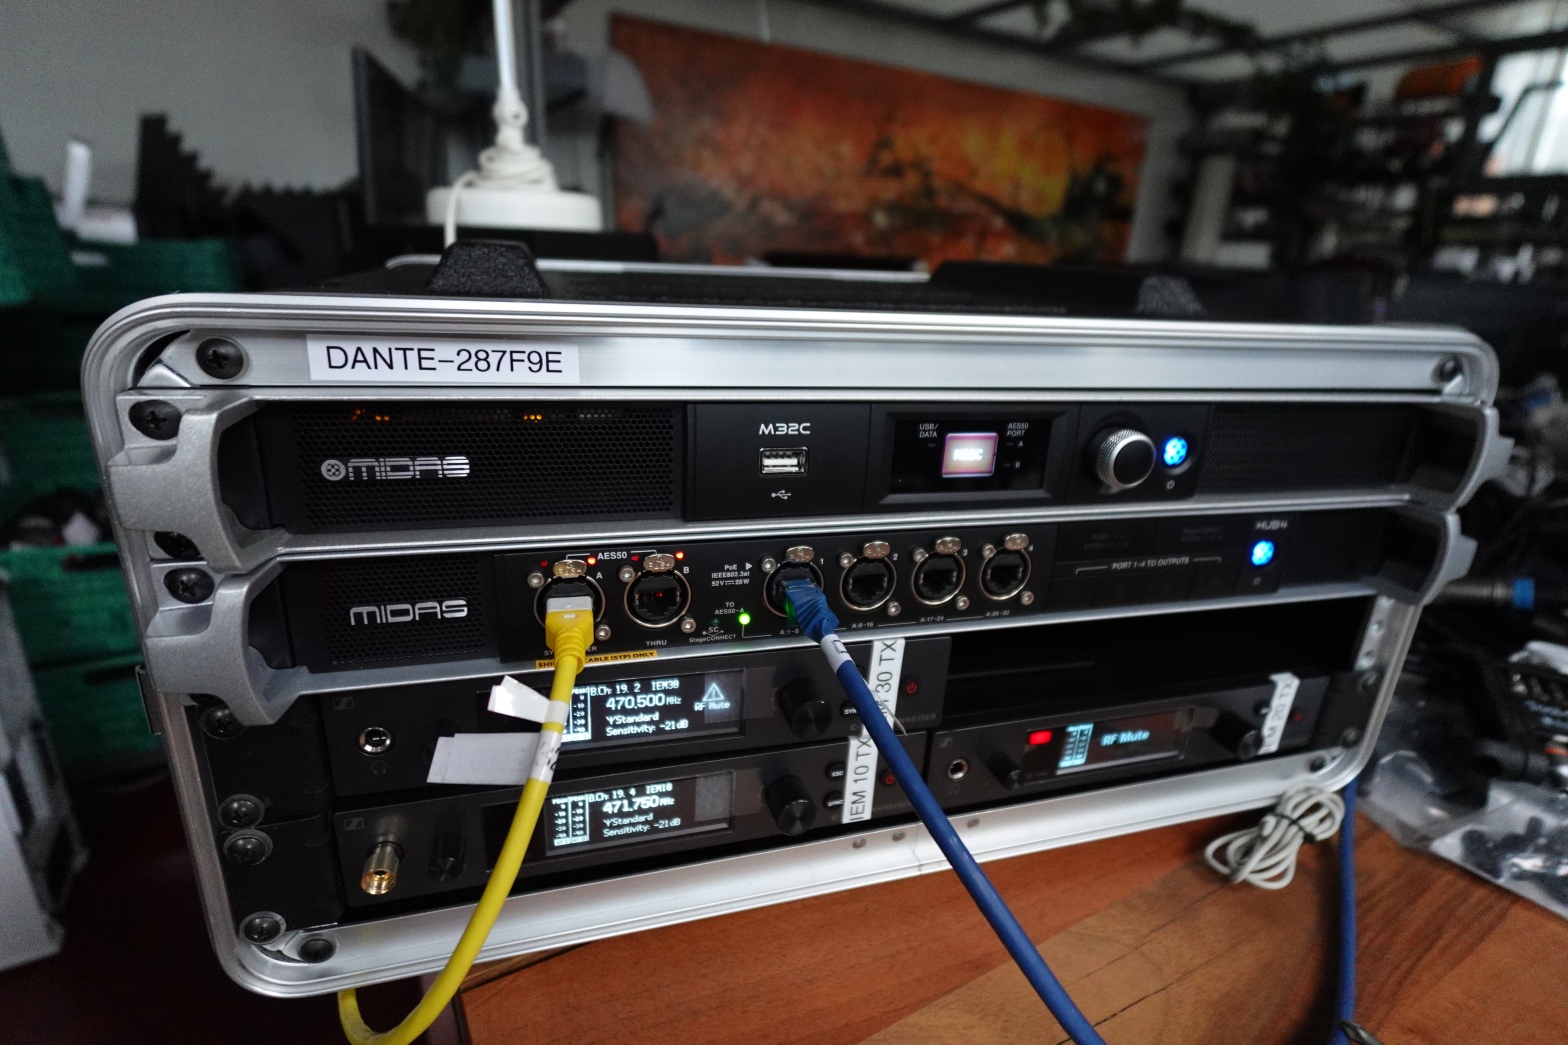
As mentioned already, the system will be built around a Midas M32C that accepts input either via AES50 or DANTE. For the latter, we swap the standard USB expansion card with the X-Dante card that allows for a 32×32 routing into and out of the mixer. When connected with the MIC rack DANTE will be used for input and output. When used with the FOH rack AES50 will be used. In both cases, DANTE can also be used in either setup for providing output channels to other interested devices.

The Midas DP48 personal mixers replace our existing Behringer P16-M mixers as they offer many advantages. As each DP48 supports 2 stereo mixes, we can either use half the number of personal mixers for talents, in comparison to the P16-M, or create 8 mono mixes from 4 personal mixers. In addition, we can route the talkback functionality of the DP48 back into FOH or anywhere else via AES50 and DANTE. Channel and group assignment can be done from either the M32C or via the DP48 which is connected to Port 1 of the HUB 4.

We then connect the 8 Sennheiser transmitters inputs to the physical outputs of the HUB4 but only use inputs marked as channels 33 and 34, 37 and 38, 41 and 42 and 45 and 46.

We add our network switch and router and configure the local network to be 169.254.002.000 with a subnet mask of 16 bits. By this any DHCP client or APIPA client receives a network address in the same network.

Everything is then connected to the power conditioner and packed into a plastic 4U rack case. And this is all regarding the build.

Back of wireless IEM rack

The Routing

To make this setup work we have to configure the routing on the M32C.

  • First, we route channels 01 to 32 from incoming AES50-A to outgoing AES50-B, which is then downstreamed to the HUB 4.
  • We then route AES50-B upstream from HUB 4 channels 1 and 2, 5 and 6, 9 and 10, 13 and 14, 17 and 18, 21 and 22, 25 and 26 and 29 and 30 to “user input” channels 01 to 16. These are the channels that contain the personal stereo mixes of the four DP48.
  • This “user input” is routed to input channels 01 to 16. Each input channel pair is configured as a linked stereo pair.
  • Every four input channels are routed left and right to 2 stereo linked mix buses. Channels 01 to 04 to MixBus 01 and 02, channels 05 to 08 to MixBus 03 and 04, channels 09 to 12 to MixBus 05 and 06 and channels 13 to 16 to MixBus 07 and 08.
  • These mix buses 01 to 08 are then mapped to outputs 01 to 14, skipping every third and fourth output.
  • The outputs 01 to 14 are finally routed to AES50-B channels 33 to 46, which are then downstreamed back to the HUB 4 where they are sent to the physical outputs 01 to 14.
  • On the HUB 4, we make sure that the DP48 are only sent upstream to the M32C and not sent to the physical outputs by activating the AES50 button until it lights up green and deactivating the port buttons until they light up white.

The Parts

Here are the 13 main parts used in the build:

  • Thomann 4U Rack Case; very cheap
  • Adam Hall AHPCS10 power conditioner
  • Netgear GS116LP 16 port network switch
  • TP-Link TL-WR802N WLAN router with one RJ45 port, powered via USB
  • Midas M32C; 1U rack mixer without physical inputs or outputs
  • Behringer X-Dante expansion card; to be used in the M32C as a 32×32 DANTE interface
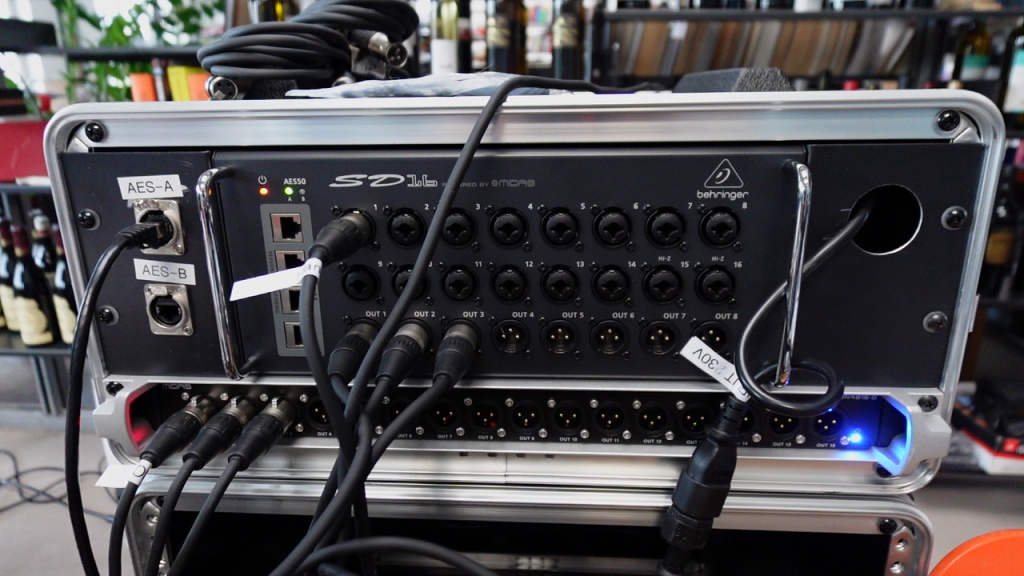
  • Midas HUB 4; 1U distributor for DP48 personal mixers; in addition with a total of 16 balanced outputs; 4 XLR and 12 6.35mm TRS; also powers the personal mixers via AES50
  • 4 Midas DP48; personal mixer with 2 stereo mixes, 12 groups selectable from 48 channels, with ambient microphone, talkback, AUX input und SD recorder that supports mix-minus
    Sennheiser AC41; combines 4 IEM transmitter into one antenna and also feeds power to the transmitters
  • 4 Sennheiser ew SR IEM G4-A1 stereo transmitter; 1U half rack size, support frequency management via network
  • 6 Sennheiser ew EK IEM G4-A1 stereo receiver; support mono, stereo or “focus” mode; with 3.5mm TRS output
  • Sennheiser U1031 passive omnidirectional antenna; can be connected to the AC41 to get better coverage of and signal on the recievers
  • 6 CCA 3.5mm IEM headphones
  • And of course: a bunch of cables …

The Performance

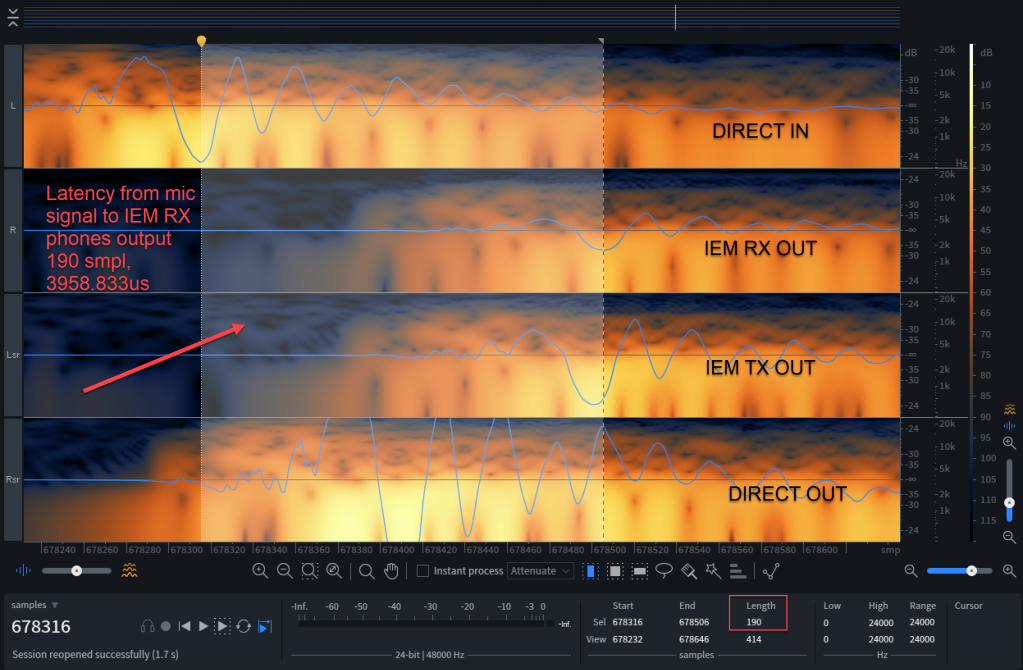
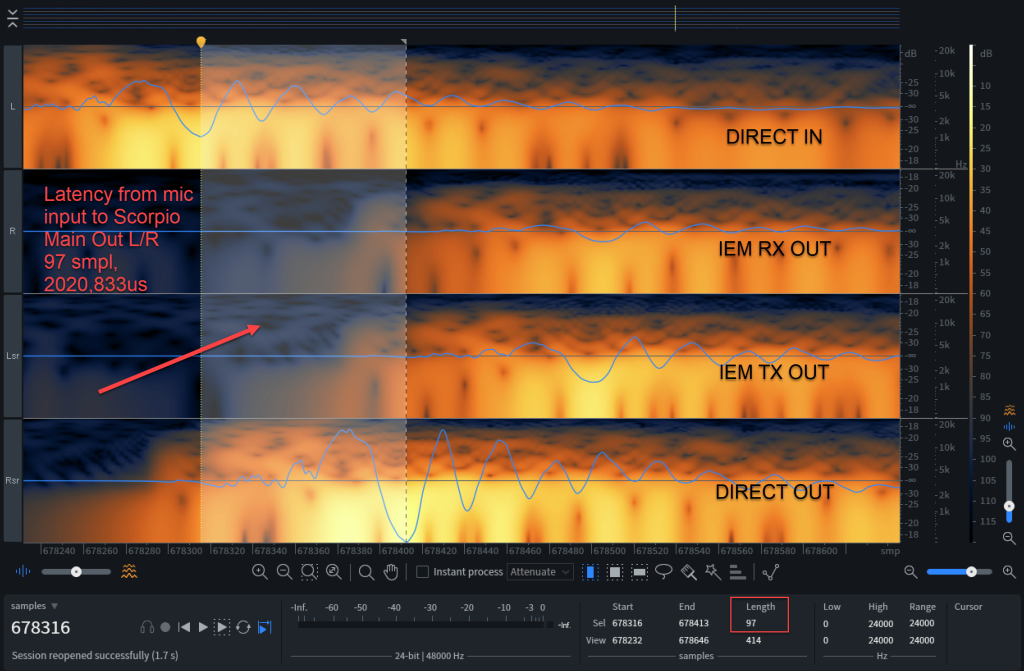
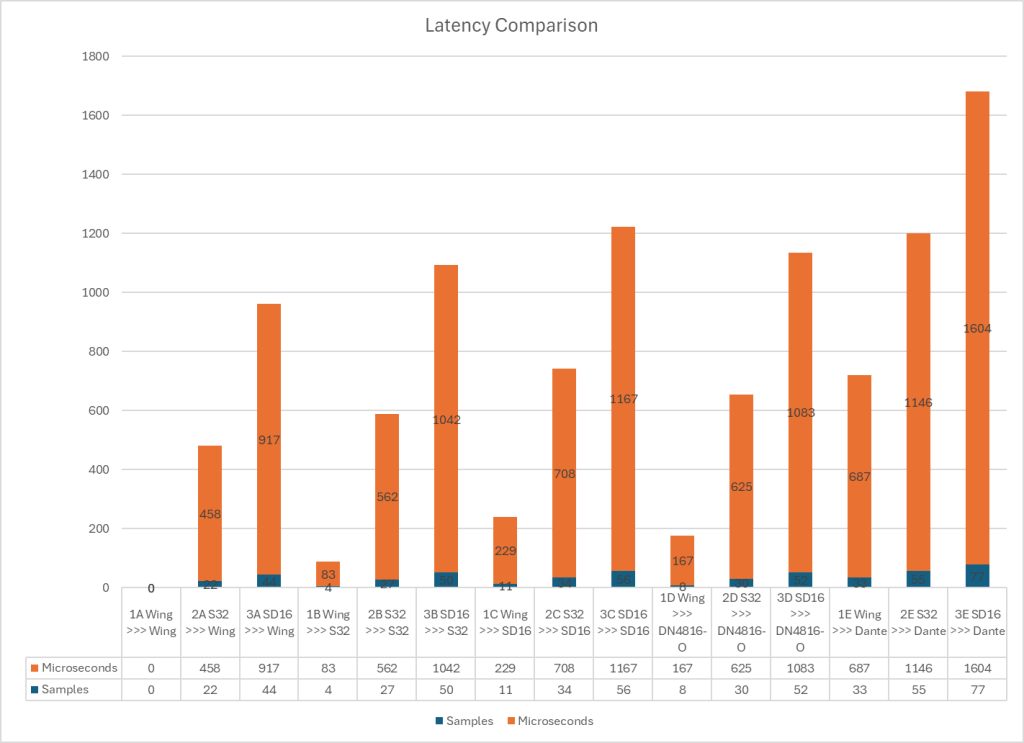
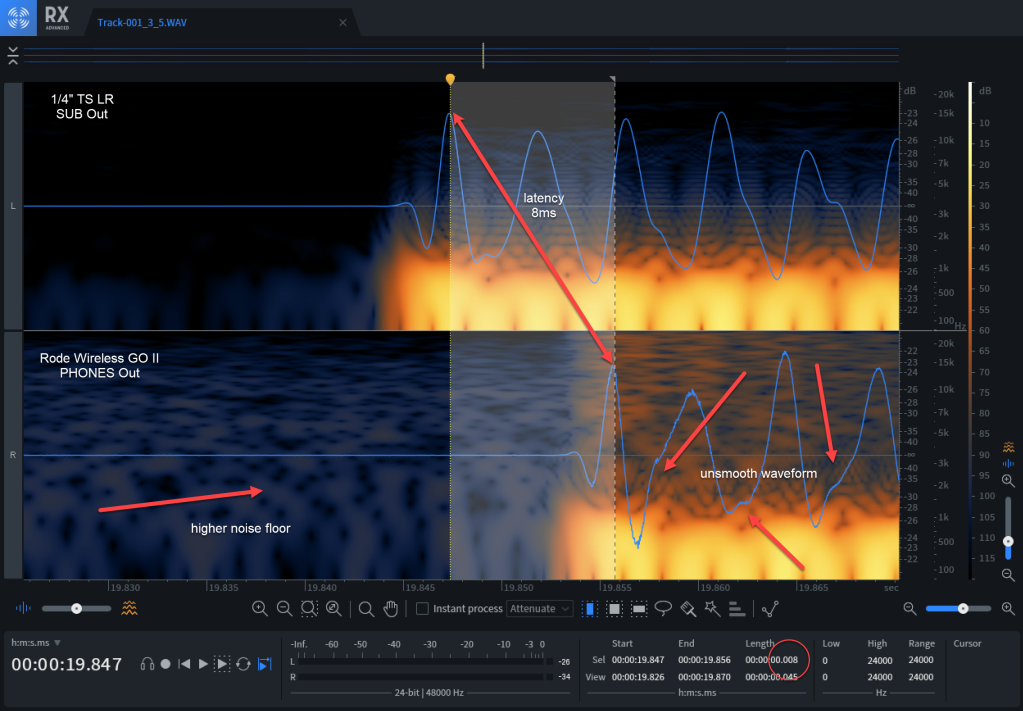
I did some latency tests to see how long the signal takes from the microphone to the actual wireless receiver. In my tests the latency was slightly over 2.06 ms. You can read more about it in Latency Test with a Wireless Microphone, through a DP48 Personal Mixer and a Wireless IEM. So, it is quite usable in my opinion. Even when singing the latency is hardly perceivable at all.

The Summary

We now have a very versatile wireless IEM rack with up to 8 channels in a very small form factor. This could be scaled horizontally to even a larger number of channels by adding some more of these 4U racks to the setup. The sound quality is ok. Maybe a digital system would be better, but then a latency increase of an additional 2 ms should be expected.

The “missing” console is ok. I hardly change anything on the mixer at all. Only when switching between DANTE and AES50 or when switching between mono and stereo mixes a scene change is needed. Everything else can be configured directly on the primary DP48.

With the Klark Teknik DN9630 I can even use this IEM rack via USB from a PC, if I do not want to use a Dante Virtual SoundCard. And if I ever need to add physical inputs or outputs I can connect a stagebox via AES50 or Ultranet; the latter if I only want to connect more physical outputs.

And this is it for today. Thanks for reading.

Corrigendum / Addendum

./.

Latency Test with a Wireless Microphone, through a DP48 Personal Mixer and a Wireless IEM

Now that we built our IEM rack it was time to bring it to a real life test and measure its latency. Would it really be usable? The short answer is definitely yes! But it certinaly is not free of any latency. We measured a net latency of roughly 2062.500us. Read on if you want to know more.

As a recap, we built a separate IEM rack that only handles the monitor mixes and the personal mixers that create them. The latter is certainly completely optional. Everything could be mixed inside the IEM mixer directly. Therefore our signal chain is probably longer and therefore slower than in less complex environments. Our incoming signals all come in either via Dante or via AES50 into the IEM rack. Inputs are not necessarily wireless, but for our test we used a cheap analogue wireless microphone setup: the Sennheiser ew 100 with the SKP 100 plug-on transmitter.

To get a direct comparison we recorded the wireless signal after it entered our recorder (so actually not being wireless any more) and we did not use a splitter before the transmitter. We then recorded the signal directly into our recorder but in parallel routed the signal via a Main L/R mix back to the recorder and to our FOH mixer, the Behringer Wing, from where we forwarded the signal via AES50 to our IEM rack.

To record the signal that would be audible in the IEM headphones we connected a single channel of the IEM receiver with a mono splitter directly to the same recorder where the original microphone signal entered the system. So, essentially we do not record a LINE signal but a PHONES signal. This is also the reason why the noise floor is higher and the signal is slightly more distorted as we can see from the image below. With this setup we can measure the introduced latency of the whole signal chain except for the latency introduced by the wireless microphone transmitter.

To measure the latency introduced by the wireless IEM transmitter we connected a single channel of the IEM transmitter’s headphone jack directly to the recorder, as well. Presuming both systems, Sennheiser ew 300 IEM and Sennheiser ew 100, are using the same technology – at least they can be used in interchangebly – we can estimate the latency transmission of the wireless microphone transmitter by looking at the latency of the IEM TX/RX pair.

And on the image below you see what is looks like when signing an A' at 440Hz direct and through headphones. Impressive – isn’t it?

A’: there is a slightly higher distortion and noise floor visible on the IEM track (bottom track, R)

Signal Path

Let’s follow the signal path from the source to the recording. The image below shows the signal chain with some operations involved inside the various devices. Further below you find a more thorough description of what is happening.

Signal chain from microphone transmitter to IEM receiver
  1. Wireless Microphone Transmitter
    Sennheiser SKP 100 A1 plug-on transmitter with a Behringer XM8500
    I did not really measure the latency of the wireless transmission into the receiver. I could have used a splitter between the mic and the transmitter and have a direct tracking recording from the split signal in parallel with the other tracks. But it was easier to record the signal from the IEM transmitter’s phone jack and presume that the latency of the IEM TX is similar to the latency of the MIC TX.
  2. Wireless Microphone Receiver
    Sennheiser EW 100 G4 A1 body pack receiver
    Wireless reception of the analogue microphone signal.
  3. LINE IN into a Recorder
    Rcording into a Sound Devices Scorpio
    The signal is mapped to Channel 1 and directly recorded to the internal SSD of the Scorpio. No additional effects are applied. NoiseSuppression and MixAssist are turned off. Only the limiter is active. The signal is then routed via the Main Bus L/R to Main L/R Out.
  4. LINE IN into Behringer Wing
    This setup with the Behringer Wing inbetween is not too realistic, as normally the mic input would run directly into a X32 or Wing (and not divert through the Scorpio). But the Scorpio cannot send signals via AES50 and I did not want to make a DANTE based test.
    The signal is directly mapped to the AES50-C output (Mono). No processing on the Wing, no mapping to a Channel.
  5. AES50 downstream into Midas M32C
    The Midas M32C is the mixer in the IEM rack
    The signal arrives at the AES50-B port on the mixer and is internally routed to the AES50-A port.
  6. AES50 downstream into Midas HUB4
    The Midas HUB4 is the distribution to the four Midas DP48 personal mixers
    The HUB4 receives 48 independent signals via its AES50-A port that are forwarded to its four AES50 powered outputs. One of them is our wireless microphone. AES50 channels 33 to 48 are in parallel directly output to its physical XLR/TRS balanced outputs and are not meant to be used by the personal mixers. The option “PORT 1-4 AES50-A 1-32” is turned on. Options “1” to “4” are turned off.
  7. AES50 upstream into Midas DP48
    Midas DP48 is the personal mixer that allows to create two stereo mixes per device
    Both pairs of resulting mixes are sent back to the HUB4 as AES50 channels 1,2 and 5,6. Additionally, channel 3,4 and 7,8 separately transport the builtin microphones and the aux ins. Talkback is routed on channel 48.
  8. AES50 upstream back into Midas HUB4
    Per single DP48 eight AES50 channels enter the HUB4
    HUB4 does not route the A and B stereo mixes of the DP48 to its physical output ports, but upstreams them directly to the M32C. Talkback channel 48 is forwareded as well, but also downstreamed back into the DP48 ports.
  9. AES50 upstream back into Midas M32C
    The M32C re-mixes the respective A/B DP48 stereo mixes
    The reason here is, that additional signals such as talkback from FOH or click tracks could be added here. Furthermore to support Stereo, Mono und Focus mode on the IEM transmitter, the mixes can be changed from either input to either IEM transmitter. That means, that every signal of every stereo mix is mapped to its own input channel. From there, these channels are routed to a mix bus and subsequently mapped to an output. Talkback channel 48 from downstream is not added to the mixes. The mixes are then internally routed to AES50 channels 33-40.
  10. AES50 downstream back into Midas HUB4
    Another time into HUB4
    With the option “PORT 1-4 AES50-A 1-32” enabled channels 33-48 are routed to the physical outputs on the back of the HUB4. The reason why we do this: M32C does not have any physical outputs on its own and we wanted to reduce space from 3U to 1U when we changed from the X32. Only the first eight channels are used and connected to four IEM stereo transmitters. By this we also use only one eight channel bank on the M32C.
  11. LINE IN into IEM Transmitter
    Sennheiser ew IEM A1 Transmitter
    The IEM transmitters can operate in either of three modes: Mono, Stereo, Focus. Effecively, both input channels are transmitted wirelessly to their respective receivers. In Focus mode L is transmitted as a single channel to a single receiver and R is transmitted as a single channel to the other receiver.
  12. Wireless IEM Receiver
    Sennheiser ew IEM A1 Receiver
    The resulting mix from a DP48 is finally received on the wireless IEM receiver and output on its Phones port. In reality this would be the end of the signal chain. Ok – more prcecisely: the end of the signal chain would be the ear of the talent receiving the mix.
    In our test setup the stereo signal of the Phones connector is split into two Mono channels and one of them is fed into the Scorpio recorder.
  13. LINE IN into a Recorder
    Rcording into a Sound Devices Scorpio
    The Mono signal of the IEM receiver is mapped to Channel 2 and directly recorded to the internal SSD of the Scorpio. No additional effects are applied. NoiseSuppression and MixAssist are turned off. Only the limiter is active.

Observations

From our previous tests with the S32, SD16 and DN4816-O stage box, we know that a change of the AES50 bus can take around 22 samples which equates to roughly 458.333us. Doing this a couple of times does build up some latency.

When I did my first test with Cedar SDNX NoiseSuppression turned on on the Scorpio (a leftover from some previous recording), I noticed a much higher latency (over an additional 2000us more). I certainly repeated the test with a that feature turned off. But it proves the point, that “effect processing” and the mixers themselves introduce additional latency of their own.

From the recording we can determine the latency that is introduced from the entrance of the microphone signal from the wireless microphone transmitter into the recorder and the exit of the mixed signal from the wireless IEM receiver into the recorder.

Latency from mic signal to IEM RX phones output: 190 smpl, 3958.833us

Though the noise floor of the lower signal is considerably higher, we can find that the latency is 190 samples. As we are running at 48'000Hz each sample takes roughly 20.833us (micro seconds). From there we can calculate the total latency of 190 * 20.833us = 3958.833us.

Again: this excludes the latency that is introduced from the transmission of the wireless microphone itself, but this still includes the latency introduced by the Scorpio recorder iteself.

From the image below we can determine the latency of the Scorpio recorder, which is 97 * 20.833us = 2020.833us.

Latency from mic input to Scorpio Main Out L/R: 97 smpl, 2020,833us

Asking Sennheiser about the latency of their ew 100 and ew 300 G4 series, I got the answer “practically no latency”. This proves to be correct when we look at the image below where we see the latency from the IEM TX headphones out and the IEM RX headphones out signal: 5 * 20.833us = 104.167us.

Latency from IIEM RX phones output to IEM TX phones output: 5 smpl, 104.167us

So, when we measure the latency of the signal from exiting the Scorpio to the IEM RX headphones out, we see 94 * 20.833us = 1958.833us. If the ew 100 G4 microphone transmitter is as fsat as the ew 300 IEM TX we should add anther 5 samples for the microphone transmission, so we end up with a total latency of (94 + 5 = 99) * 20.833us = 2062.500us.

Latency from mic signal leaving Scorpio Main L/R to IEM RX phones output: 94 smpl, 1958.833us

Conclusion

As mentioned before, I do not expect the wireless microphones to enter through the Scorpio and only then enter the main mixer. And even if we did that, I would end up with a total latency of 194 * 20.833us = 4041.667us – which is still very much acceptable.

So, all in all: our IEM rack is fast enough to be used with wireless IEM for instruments and vocals while being flexible enough to support extensive routing and personal mixing.

Addendum

If you are interested in the latency of the Behringer X32 Rack and the Behringer P16-M there are two interesting articles in German here:

Corrigendum

./.

Extending the Behringer Wing by 48×40 in a 4U rack

In this post I describe how we extended our Behringer Wing with an additional 48 inputs and 40 outputs via AES50 in a 4U rack case.

The Summary

The rack case consists of a Behringer SD16 that connects to a Behringer S32 via AES50. In addition, we connect a Midas DN4816-O via its Ultranet input to the Behringer S32. From there all 48 inputs are upstreamed to and all 40 outputs are downstreamed from the Behringer Wing via AES50. All rack parts are powered through the Adam Hall PCL 10 Power Conditioner.

The Configuration

As AES50 supports 48×48 channels we needed to find a combination of stage boxes and modules that would come close to this maximum. We started with a Behringer S32 as the main item of the extension, as this stage box supports 2 AES50 ports and an Ultranet output. We then added a Behringer SD16 (instead of a Behringer S16) for two reasons:

  1. We already had a spare SD16 catching dust in a shelf for quite some time.
  2. In contrast to the S16, the SD16 supports XLR/TS combo input jacks.

The downside to this is the larger form factor (3U vs 2U with the S16). The 4 Ultranet ports are not needed either. By combing these two stage boxes we reach a 48×24 channel count. That is why we added a Midas DN-4816-O reaching a final channel count of 48×40.

Note: In order to reach the maximum 48×48 channel count one *could* have added a Behringer ADA8200. However, this would have consumed another unit in the rack and added roughly 25 CHF/30USD per output port along with some additional complexity and latency.

To make this setup work we need to configure a few things:

  1. On the DN4816-O we need to switch to Ultranet and Individual;
  2. The SD16 connects via its AES50-A to the AES50-B port of the S32;
  3. On the SD16 we need to switch OUT to 17-24;
  4. We connect the S32 via AES50-A to a free AES50 port on the Behringer Wing;
  5. The console needs to define a sync source and provide it to the S32; we set our to the DANTE module (or INTERNAL if we had no Dante);
  6. The console needs to route (up to) 40 output channels downstream via its AES50 port to the S32;
  7. The console needs to route (up to) 48 input channels upstream from its AES50 port from the S32.

As we are using the SD16, which comes with 4 powered Ultranet ports, we could use these to connect an additional DN4816-O to use as a signal splitter for ports AES50-33 to AES50-48. Or we could run a Cat5e cable to a P16-M and connect remote speakers via unbalanced 1/4″ TS line out.

With this setup, the routing and port assignment would look similar to the tables below. The good thing: we do not need a Wing for this. We can use our X32 RACK or the Midas M32C (or any other X32/M32 with AES50 for that matter) or even a Klark Teknik DN9630 as well.

Signal sent from console downstream to extension
Signal sent from extension upstream to console

For additional information on how these stage boxes can be connected and route their AES50 channel, have a look at the Behringer documentation. There you find useful diagrams like the one below:

Linking an S32 with an S16, taken from https://mediadl.musictribe.com/media/PLM/data/docs/P0BMC/S32_QSG_WW.pdf

The Test

So, one question remains: what is the performance (as in latency) hit we get by using such a stage box? Can we use it as a digital patch bay? Let’s do some testing …

The Setup

With our test case below we have 3 input signals and generate 18 output signals (1A, 1B, 1C, …, 1E, 2A, …, 3E) all running at 48kHz:

Roland TR8-S as the input source for measuring

Connect a Roland TR8-S with

  • ( 1 ) BD/ASSIGN1 to the Behringer Wing,
  • ( 2 ) SD/ASSIGN2 to the input of the S32,
  • ( 3 ) LT/ASSIGN3 to the input of the SD16 (all instruments being a 909 Bass2 with the same parameters).

Route the signal

  • ( A ) to the output of the Wing,
  • ( B ) to the output of the S32,
  • ( C ) to the output of the SD16,
  • ( D ) to the output of the DN4816-O and
  • ( E ) to the DANTE output

Connect all these outputs to the Sound Devices Scorpio as line input and record the sound.

The Result

Visualising the difference in latency

Below you find a summary with the results. Some observations:

  • Not surpisingly the direct connection to and from the Wing is the fastest.
  • Connections to and from the SD16 have twice the latency as connections from and to the S32 due to the fact that the signal must change from one AES50 port to the other (adding 22 samples).

I did a couple of recordings and uploaded one of them so you can have a look for yourself.

Audio recording used for measuring the latency
Relative LatencyInputs
Output( 1 ) Wing( 2 ) S32( 3 ) SD16
( A ) Wing Analogue (CH01 – CH03)0smp / 0us22smp / 458us44smp / 917us
( B ) S32 (CH04 – CH06)4smp / 83us27smp / 562us50smp / 1042us
( C ) SD16 (CH07 – CH09)11smp / 229us34smp / 708us56smp / 1167us
( D ) DN4816-O (CH10 – CH12)8smp / 167us30smp / 625us52smp / 1083us
( E ) Wing Dante (CH13 – CH15)33smp / 687us55smp / 1146us77smp / 1604us
Latency test results
Latency Comparison

The Parts

  1. Behringer S32
    3U, 32 mic pre-amps XLR inputs, 16 balanced XLR outputs, 2 AES50, 1 Ultranet output
  2. Behringer SD16
    3U, 16 mic pre-amps XLR/TRS combo inputs, 8 balanced XLR outputs, 2 AES50, 4 powered Ultranet outputs
  3. Midas DN4816-O
    1U, 16 balanced XLR outputs, 1 Ultranet input, 1 StageConnect Master, 1 StageConnect Slave
  4. Adam Hall PCL 10 Power Conditioner
    1U, 10A, 1 AC IEC input, 8 fused and switched AC IEC outputs, 1 unfused and unswitched AC IEC output
  5. Thomann Rack Case 4U
    4U, 400mm
  6. Cat5e Cable
    10m shielded cable with Neutrik etherCON connectors to connect the extension with an AES50 clock master

The Price

Below you find a price indication of the components used in the build (with exchange rates at the time of writing).

11.04136 0.890121.13897
CHFEURGBPUSD
S32880916.3968783.30561002.2936
SD16580603.9888516.2696660.6026
DN4816-O300312.408267.036341.691
Power Conditioner135140.5836120.1662153.76095
4U Rack Case8588.515675.660296.81245
Cat5e Cable2526.03422.25328.47425
Sum20052087.92681784.69062283.63485
Price of the components

The Conclusion

For roughly 2000 CHF (2100 EUR, 1785 GBP, 2280 USD) we get a total of 88 ports with 48 (!) microphone pre-amps (and yes, their quality is not outstanding, but defninitely usable) and a whole bunch of XLR/TRS combo jacks.

The overall latency is still incredibly and unnoticable low with the inputs and outputs on the SD16 being the slowest. It is interesting to see how fast Dante is in comparison to AES50.

Rear view with Behringer SD16 and Midas DN4816-O

Using the CME WIDI Jack with a BOSS GT-1000core and an RC-5

Recently, I showed a pedal board with a BOSS GT-1000core and an RC-5 looper. One of the differences between the GT-1000core and the GT-1000 is the lack of bluetooth support. We still can connect to the GT-1000core via USB to use BTS – but only with a computer. When we want to use BTS for GT-1000 with a tablet we cannot connect to it via USB. This is the same behaviour as with the GT-1000. There is a solution to this however: enter CME WIDI Jack – a MIDI to bluetooth gateway. This has been demonstrated in various places across the internet.

So, when I got my WIDI Jack I was a little surprised that I did not get it working right away. After pairing, upon first connection I received a “Wrong Device” message from the app (on Android). My setup might differ from others, as I have (the MIDI in port of) a BOSS RC-5 looper connected to the MIDI out port of the GT-1000core.

In case you have a similar setup with the GT-1000core not being the only active MIDI device – this is what I did and how I wired it up:

  1. BOSS GT-1000core MIDI out (3.5mm) — > BOSS RC-5 MIDI in (3.5mm)
  2. BOSS RC-5 MIDI out (3.5mm) — > CME WIDI Jack MIDI in (2.5mm)
    Note: this essentially means, the RC-5 is powering the CME WIDI Jack (and not the GT-1000core).
  3. CME WIDI Jack MIDI out (2.5mm) — > BOSS GT-1000core MIDI in (3.5mm)

The important bit here is to have the WIDI Jack directly connected to the GT-1000core.

Apart from this, on the RC-5 I only had to enable “MIDI Thru” for the MIDI port via the Setup menu:
Setup | MIDI | MIDI Thru: MIDI OUT
Note: you can also set this to “MIDI/USB” (not needed in my scenario).

As mentioned above, the RC-5 is powering the WIDI Jack. So, in case you are switching off the RC-5 (for example, to preserve energy) the WIDI Jack needs to be powered by either USB-C or by connecting it to the MIDI out port of the GT-1000core. The latter might be a bit fiddly (at least in my setup) as we have to swap the 3.5mm-to-3.5mm TRS cable with a 3.5mm-to-2.5mm TRS cable. Good news is, two 2.5mm-to-3.5mm TRS cables come with the WIDI Jack.

Note: the WIDI Jack can be unplugged when it is not needed (again for example, to preserve energy or to stop the blue LED from blinking all the time). In this case, the RC-5 is still synced via the GT-1000core.

And this is all that needs to be done to get the WIDI Jack working with a GT-1000core and a RC-5.

Now, I only have to figure out how to use BOSS Tone Studio for GT-1000 in landscape mode on my tablet. Anyone?

A battery powered mobile guitar rig in a BOSS BCB-30X case

Being most of the time in a caravan and my proper sound gear literally more than a 1000 miles away, I decided it was time for a mobile guitar rig aka pedal board. Not being able to carry my favourite 8×12″ cabinet with me I went looking for a DSP solution that could do it all while being still somehow affordable. But before I dive into the solution, I will quickly list the requirements I put myself under.

The requirements

So, here it is what we are looking for:

  1. the whole setup must fit in a single case
  2. weight must be under 5kg
  3. maximum dimensions: 400mm x 400mm x 150mm
  4. no mandatory app or software required to operate it
  5. possibility to power it via AC or batteries / power bank
  6. runtime while on batteries 4h or more
  7. string tuner
  8. metronome
  9. wireless guitar transmitter / receiver
  10. required effects: chorus, compressor, distortion, delay, equaliser, octave, overdrive, reverb
  11. optional effects: wah-wah
  12. at least 2 footswitches for switching effects
  13. dual stereo output
  14. audio interface support
  15. MIDI support
  16. no Thunderbolt
  17. possibility to connect to XLR
  18. single-track looper support operated by footswitches, with overdub and saving/loading backing tracks
  19. optionally drum/rhythm support in looper
  20. optional speaker / monitor
  21. wireless monitor headphones without noticable latency
  22. minimum wireless reach 3m

The setup

Unpacked mobile guitar rig

As already mentioned before, I started with the search for a DSP or effects processor where hopefully most of the features were already present. And after some looking around, I came across the BOSS GT-1000, the core version in particular. Only the looper and wah-wah with a pedal were not built into that device.

Note1: yes, I know there is a built-into auto wah-wah – but in my opinion this does not come close to a real wah-wah and is not really my thing.

Note2: the integrated looper can only record up to 38s (in mono) and does not let you save or load tracks.

I soon realised that an expression pedal or a full-blown Cry Baby would break the size constraint, so I made a mental note to myself that this was unlikely to make it into the final design. I already knew the RC-505 looper and therefore looked for a single track pedal version of it. With the BOSS RC-5 I also got MIDI support which I would need to sync it up to the GT-1000core. And luckily, both devices use a 3.5mm TRS MIDI connection. With these devices being preliminary selected I went looking for a pedal board box. As it seemed, the BOSS BCB-30X was able to make space for three standard sized pedals, so the double sized GT-1000core and the RC-5 would fit in perfectly. Only the space for the connections seemed a little bit constrained. Connecting the RC-5 via SND1/RTN1 and putting it to the end of the effect chain was easy to do – both physically and configuration-wise. Connecting the power distribution cables showed that the straight connectors that were supplied with the pedal board used up quite some space behind the devices. A cable with 90°-angled connectors would have been better.

As I had good experience with the BOSS WL-50 – a wireless receiver with charger in pedal format that would not fit into the case – I went for the BOSS WL-20L which works perfectly with my Fender Stratocaster or Gibson ES-335. Charging must be done via micro-USB-B (yes, still not extinct – I keep thinking that Roland and BOSS must still have a zillion of these sockets in their warehouses they want to get rid of).

Wireless monitor headphones proved to be more difficult. First, the GT-1000core does not have a dedicated headphones output. It is either MAIN L out or stereo headphones – that’s weird. And the headphones only work in stereo if the MAIN R out is unplugged. Even weirder, the Mono output is R instead of L – normally it is the other way round. But this did not prove to be the main problem. I needed a small and low-latency wireless connection for the headphones. First, I tried a TRS-to-Bluetooth adapter, but that introduced way too much latency – I essentially got an unwanted delay for free in my ear. So, I went for a Rode Wireless GO II (single transmitter with receiver) with a 1/4″ (6.35mm) TRS to 1/8″ (3.5mm) TRS adapter and cable. I could not use the supplied 3.5mm cable as it would not fit into the 1/4″ socket of my 1/4″ adapter. Regarding the headphones, I opted for a pair of used Bang & Olufsen A8 in-ear headphones that had been stuffed away for years. But their sound is still ok. I set the output to -20dB on the Global EQ output settings to prevent the signal from distorting on its way through the microphone socket of the Wireless GO transmitter. Latency is not noticable – at least not for me. And the best part: now I can use any pair of 3.5mm headphones with it – instead of being bound to a specific bluetooth headset.

Note1: the A8 are really comfortable to wear as they are very light and the earphones are not resting on the inside of the ear. They are long time not in production any more. So, I auctioned a couple of spare ones just in case.

Note2: And for some reason my beyerdynamic DT-770 PRO 250Ohms headphones do not seem to distort as quickly as the A8 – mystery …

When I tried to power up the GT-1000core and the RC-5 via the MyVolts cable from a 5V USB socket of the Zendure power bank, I noticed that I could only power one device at a time. With a larger power bank (some no-name, different manufacturer) I was able to power both devices. So, I got myself a 9V USB-rechargeable battery from EBL. And as an alternative, I added a second MyVolts 9V cable and a USB-C to USB-A adapter, so I could power both devices from the power bank. I quickly thought about using a USB-C trigger board and build my own DC-cable. However, the main reason for not doing this was that with a standard 9V battery or the two MyVolts cables I could run it from any USB-A power source. On the other hand, building a custom cable could actually save some space.

And then I found another power bank (Jsaux) with slightly larger dimensions that just fitted in to the box and could power bothe devices at the same time. That simplified things a lot and gave me additional mobile operating time. As I could get hold of only one of these power banks I still keep the Zendure in the case.

I used TS 1/4″ to (unbalanced) XLR cables as the MAIN out connection, as I would be plugging this into active loudspeakers most of the time anyway. And in case I needed to connect to a TS 1/4″ socket, I added two XLR to TS 1/4″ adapters. One never knows …

The application

Just building such a setup does not mean that it is in any way usable or without flaws. After some intensive testing I must admit that I am positively impressed. Regarding the build quality of the case: the setup is extremely compact and the box is sturdy. Even passing security checks at the airport was not a problem.

Note: the case is even that small that I could carry it as an additional hand luaggage with BA next to my bag back.

For putting everything back together and not jamming any cables a little of exercise is needed. And not losing or misplacing any cables not needed when the case is open needs a little bit of discipline, too.

Regarding the musical capabilities: I am very happy with the functions of the GT-1000core. Of course, it does not sound like a real huge amp and it does not have all the vintage tube pedals. But, I am using it as a mobile setup. And the sound keeps more or less the same, nearly regardless of which speaker I am plugging it into. I read about complaints from some people regarding the small display and the need for the PC software to operate the DSP. I must say I can live very well with the small display. For major configuration tasks and backups the software is fine. For fine-tuning I find the display totally acceptable. Wireless range is ok, but turing the back to the guitar receiver can be problematic. And I have never tested it in a very crowded WiFi environment.

Certainly, as always some things could be better. And though the following list seems rather long, for me the positive side weighs way more than just the bigger half:

  • the mess with all the different USB cables (A, standard B, micro B, C);
  • having a speaker in the box would be nice – but space is really limited;
  • recharging all items is time-consuming in more than one sense
    (2 9V batteries, 2 Wireless GO, WL-20L RX/TX and the power bank needing charge sockets);
  • the WL-20L cannot be powered off manually but has to be unplugged when not in use
    (otherwise it drains its battery);
  • the dual-use of output sockets for SND2/RTN2 and SUB is limiting;
  • no rhythm / drum kit section;
  • no jazz drum kit on the RC-5;
  • no proper looper in the GT-1000core;
  • only 99 patches on the RC-5 in contrast to 250 on the GT-1000core;
  • no dedicated headphones socket means I have to disconnect and reconnect quite often;
  • the metronome of GT-1000core is not synced with the RC-5 (despite of being connected via MIDI).

The parts

The following is a list of all the parts used in this setup with links and some additional information. The numbers (#nn) correspond to the number of the items on the image below.

Mobile guitar rig
  1. BOSS BCB-30X (#12)
    power distribution and spare 9V connection (#11)
    2* patch cables TS (from a BOSS BCK-12 kit, 90° angled, solderless) (#14)
    USB-C plug to USB-A receptable adapter (#7)
  2. BOSS GT-1000core guitar effect processor (#21)
    micro-USB-B to USB-A cable for connection to a PC (#26)
    3.5mm TRS to 3.5mm TRS cable for MIDI connection with RC-5 (#19)
    2* Neutrik NA2FP 3 pole XLR female – 1/4″ TS Mono plug (#30)
    2* 1m 1/4″ TS Mono plug to 3 pole XLR male (#13)
    pointless stomp switch toppers (#20)
    nominal current draw: 670mA @ 9V ^= 6.030W
    operating time with Zendure battery: 37Wh / 6.030W ~ 6.1h
    Owner’s Manual, Parameters Guide, Sound List, MIDI Implementation, limitation of the effects in a single patch
  3. BOSS RC-5 looper (#18)
    standard (as in grandma) USB-B to USB-A cable for connection to a PC (#10)
    current draw: 170mA @ 9V ^= 1.530W
    operating time with 1 EBL battery: 5'400mWh / 1.530W ~ 3.5h
    Owner’s Manual, Reference Manual
  4. BOSS WL-20L
    consists of transmitter (black, #29) and receiver (grey, #28)
    micro USB-A cable for charging (also used for charging the 9V battery) (#8)
    operating time: ~12h
    Owner’s Manual
  5. Rode Wireless GO II Single
    consists of a receiver (#3) and a single transmitter (#4)
    2* 30cm USB-A to USB-C charging cable (#5)
    operating time: ~7h
    User Guide
  6. Bang Olufsen A8 earphones (#22)
    1/4″ (6.35mm) TRS to 1/8″ (3.5mm) TRS adapter (#23)
    short 1/8″ (3.5mm) TRS to 1/8″ (3.5mm) TRS cable (#24)
  7. BOSS PSB-1U 9V 2A power supply (#16)
    comes with BOSS GT-1000core, but I use it with a 90° angeled Euro plug instead of the 1m cable (#15)
  8. 2* MyVolts Ripcord USB-A 9V cable (#9)
    5.5mm / 2.1mm, center negative
  9. Jsaux 10’000mAh USB-C PD battery/power bank (#2)
    dimensions: 82mm x 58mm x 26mm; this just fits into the case
    nominal power: 10'000mAh * 3.7V = 37Wh
    Note: this can power both devices at the same time, resulting in an operating time of ~4.9h; however it cannot power both devices while being charged
  10. Zendure 10’000mAh USB-C PD backup battery/power bank (#1)
    dimensions: 79mm x 56mm x 26mm
    nominal power: 10'000mAh * 3.7V = 37Wh
    USB-C to USB-C cable for charging (#6)
    Note: this cannot power both devices at the same time, resulting in an operating time of ~6.1h for the GT-1000
  11. 2* EBL 9V 5400mWh battery (#27)
    rechargeable via micro-USB-B
    nominal power: 600mA @ 9V = 5.4Wh
  12. a set of Ernie Ball regular slinky (#17)
    gauge .010, .013, .017, .026, .036, .046
  13. a Dunlop Delrin 500 1.5mm pick (#25)

The details

I wanted to see what the latency of the Rode Wireless GO II would be compared to the normal wired output. So, I connected the SUB R Out / SEND 2 of the GT-1000core (output level 100, and -10dB) to a Sound Devices MixPre-3 II on channel 1 via XLR and PHONES Out of the GT-1000core (-20dB) on channel 5 to AUX1 In. The higher noise floor and the less smoother wave form of the wireless track are apparent (I played a flageolet tone (XII.) on the A string). The time difference is roughly between 8ms and 9ms as we can see from the selected interval on the image below. This equates to a distance of less than 3m of the speed of sound. Playing with a 5m/15ft cable away from a amp/cabinet creates a larger latency. So, this is totally acceptable for me …

Rode Wireless GO II llatency and noise floor

The summary

This mobile pedal board runs over 4.5h via the Jsaux power bank or over 10h when combined with the other power bank and both 9V batteries (battery swap required) or somewhere between that with a combination thereof. And all this in an extremely compact and lightweight form factor with tens of effects to choose from. Also, being completely wireless from the case is a real pleasure when playing. I can absolutely recommend it! Now the only thing left is learn how to play …

Corrigendum / Addendum

  • Contrary to what I said, the BOSS WL-20L do not completely drain the battery – the transmitter enters standby after one hour and the receiver enters standby one hour after having no connection with the transmitter. This, essentially means, if the devices are not unplugged after use, the receiver will be powered up for at least two hours after use. In my case, I seemed to be just unlucky that the receiver was empty when I wanted to use it next time.
  • Depending on the use, I managed to power both devices for up to seven hours instead of just five hours with the Jsaux battery.
  • It is possible to power both devices with the Zendure battery, but only when using separate MyVolts 9V adapters for each device. Power up sequence:
    • Disconnect the RC-5 from the 9V distribution (#11)
    • Connect one MyVolts 9V adapter (#9) to the USB-A socket of the battery (#1), connect it to the GT-1000core (#21) power it up
    • Connect the other MyVolts 9V adapter (#9) via the USB-C to USB-A receptable adapter (#7) to the USB-C socket of the battery (#1), connect it to the RC-5 (#12) and power it up
  • I added a CME WIDI Jack, so now I can connect via Bluetooth to the GT-1000core. See this article on how to do it.
BOSS BCB-30X with packed rig

Circle of Fifths

On New Year’s Eve I treated myself to a new guitar. And when it arrived two weeks later, I somehow realised that I must have had forgotten a thing or two over the last 25+ years that I hadn’t played. What a surprise! Not even “stairway to heaven” – the one track one must play in a music store (except for Cassel’s Music if you remember Wayne’s World) …

“No Stairway to Heaven” at Cassel’s Music, image from youtube.com

So, I had to do it all over again. Music theory, chords, patterns – the whole nine yards! I grabbed myself a license of GuitarPro (no affiliation) and started with the very basics. And then I came across the Circle of Fifths. Interestingly, a quarter century later I could make more sense out of it. In the process of regaining my muscle memory I expanded the circle with some hints for scale patterns as you can see below.

Circle of Fifths (or Fourths - depending on how you look at it)
Circle of Fifths (or Fourths – depending on how you look at it)

I am not going into the basics of the circle, there is plenty of information about this available. However, I will quickly describe what I added: For every scale I noted down three patterns (from the long list below) that are relatively easy to execute. Their colours are black, blue and green, respectively. The red notes mark the start of the scale. The alternating black, blue green ring placed around the major chords contains the numbers on the fret board on where to start with the index finger. Every pattern moves 5 frets from the previous pattern up the frets with XII. being the highest fret. From there it starts at I. (n' = (n + 5) % 12). Between scales we move up 7 frets (n' = (n + 7) % 12).

For example C Major: the black pattern starts at fret VII. (7), blue at XII. (which is 12 = 7 + 5). With the green pattern the it wraps around to start at V., as 17 = 12 + 5, and 5 = 17 - 12). The next scale G Major then starts the black pattern at II., as 14 = 7 + 7, and 2 = 14 - 12. And from there the other coloured patterns can be calculated as before.

I also added a hint regarding tonic, subdominant, etc. (with all Major scales starting with a capital letter and the minor scales lowercase in dark orange) but this is something that can be found on other circles as well.

Each of the coloured patterns consists of 18 notes (not necessarily starting at the base note, which is – as previously mentioned – painted in red. In order to play the last note, one either has to bend up a full note, or slide up.

I found the diagram useful as it allowed me to more easily visualise and remember the scales and maybe someone else on the same journey as I does so as well.

Scales and Patterns

Vocals and the Roland MC-101

A lot and probably enough has been written about the amazing features of Roland’s MC-101 groovebox. This box has so much to offer – except for proper input connections. In this article I write about different options on how to use the groovebox in combination with vocals for a live performance.

Essentially I want something like the Roland MV-1 with better “portability” or a Roland SP-404 MKII with multiple tracks and a ZEN-Core sound engine.

The only way the MC-101 accepts input is via its type B USB port that connects to a USB *host* device. This effectively means that you cannot easily get vocals into the device.

Side note for the younger folks among us: This is a connector invented in 1996 and was given a second life in 2001 with the advent of USB 2.0. But it has been deprecated since 2017 (some 5 years before writing this article and a good two years before the MC-101 hit the markets).

So once we manage to connect the MC-101 (probably with the help of a USB-C adapter) to our phone or tablet, we can then start sampling sounds into the MC-101. I leave the option to connect to a computer aside as I am focusing on a very mobile setup here. Instead of just using a looper track with limited recording time we can export that looper track to a WAV file and then assign it to a pad on a drum track, which gives a 16 different (vocal) samples per clip.

So besides the problem that we cannot use input effects (like reverb or chorus) while getting audio into the MC-101, we face the problem that we cannot route audio from one external device to another. Though we can attach a microphone to the phone or tablet while connecting to the groovebox at the same time, it seems that audio routing in Android or iPhone/iPad is not a use case for the masses. There is at least one app for the iPhone/iPad called AUM that claims to support audio routing of different devices. However, in my tests though the devices showed up in the app, I could not get it to work on my iPad. And I could not find a single app that would allow me to do this on Android.

So what are our options now?

Basically I want to achive the following:

  1. Perform live with the MC-101 while being able to have live vocals along with that performance.
  2. Ideally, the vocals should be beefed up with effects like reverb or chorus.
  3. I want to record vocals into the MC-101 (as samples) for later playback during the live performance.
  4. The whole setup must be as light and portable as possible.
  5. Everything must be battery or USB powered.
  6. I want to use as few devices and cables as possible.
  7. I expect an Android phone or tablet as a device that I will have with me anyway.
  8. I do not want to rely on other hardware devices that I do not carry with me.

After the initial findings that out-of-the-box support with Android (or even iPad) did not seem to exist, I looked for alternatives which I found in these devices:

  1. Use a Raspberry Pi 3 B with PieJam (or similar software)
  2. Use a Roland GO:Mixer Pro-X
  3. Use a Boss RC-202
  4. Use a Boss VE-5
  5. Tascam DP-008EX

Raspberry Pi 3 B

In this setup we connect a USB microphone such as the Audio Technica ATR2100x USB to one of the USB ports of the Raspberry. The MC-101 will also be connected to one of the USB ports of the Pi. Routing could be done with PieJam. However, we then needed the Raspberry 7″ TFT touch screen as well. PieJam provides basic acoustic effects like reverb. As an alternative, routing via pavucontrol should be possible (not tested), but then we would lose the audio effects.

Rapsberry Pi 3 B+, https://www.raspberrypi.com/

With this we can directly record into the MC-101. For getting the mix out of the Raspberry we can use a simple USB audio adapter like this one, and use the 3.5mm / 1/8″ TRS output port:

Hama USB-A audio adapter, http://digitec.ch
Hama USB Audio Adapter, http://digitec.ch

As an alternative could be to use one of the boards from HiFiBerry in case we want an RCA output or similar.

It would also be possible to use the stereo out of the MC-101 itself to send the combined audio to speakers. We would then not need the additional USB audio adapter.

The Raspberry itself weighs under 50g and even with the case would be one of lightest options here . Power consumption around 400mA (at 5V) without attached USB devices is relatively high when compared to the other options.

Roland GO:Mixer Pro-X

Originally intended for these happy people of SCHÖNER WOHNEN doing podcast-style jam sessions at the coffee table dancing their name on TikTok, this device may actually have some use.

Jamming with the GO:Mixer Pro-X, http://youtu.be/1wBXT-DdR8Q

It features -amongst others- an XLR input to which we can connect our microphone and a 3.5mm TRS input from which we can get the sound of the MC-101. The mix can then be sent out via its 3.5mm TRS stereo out.

The GO:Mixer Pro-X however does not support vocal effects, so no reverb. Recording into the MC-101 would go via the phone or tablet by recording to a WAV file on the mobile device first, and the playing it into the looper track or directly importing it onto a pad. From there we can use all the effects that the MC-101 offers.

A plus with this device is, we can use the phone to create a recording of the whole performance and have the option of a separate fader (or knob) for adjusting the final mix.

With only 220g this setup is quite light. And the power draw of 170mA is pretty small as well.

To get reverb into the signal chain we could use an effect pedal like the TC Helicon VOICETONE R1. However, with a weight of 420g and additional cables needed, this make the whole setup much clumsier. This “weight problem” is due to the fact that pedal are supposed to be sturdy. I was already wondering, if we could replace the metal parts with plastic made form a 3D printer. But that is another story.

Side note 1 (not tested): the pre-previous version, the GO:Mixer is even lighter and uses less power. It is not manufactured anymore, but it can still be purchases on platforms like eBay. It lacks an XLR input for microphones, but provides a 1/4″ (6.35mm) input instead. If this was a working setup and we skip the “reverb” requirement, so might be the even better option than the Pro-X.

Side note 2 (not tested either): There seem to be other devices like Maker Hart JustCombo that appear to do the same as the GO:Mixer. Exact specs, however, are difficult to find or differ from source to source.

Boss RC-202

The little sister of the RC-505 gives us everything we want – and more, which is the weight. With 950g we get a 2 track mixer that can be powered via an adapter cable from a USB power bank. It has all the effects like reverb and chorus, plus the additional benefit of being a real looper with 99 layers. The rated power consumption of 440mA @ 9V is relatively high, but a regular power bank should get you through the gig.

Boss RC-202, http://boss.info

Inputs and outputs are proper 1/4″ (6.35mm) sockets which have the downside of asking for bigger and such heavier cables as well.

Boss VE-5

Another device that does not seem to be sold anymore. There are however a few used models to buy. Though not tested by me, the specs seem promising. It features an XLR input and a 3.5mm TRS auxiliary input and a 3.5mm phones/line output. And it has effects like reverb.

A current draw 190mA @ 9V is more at the upper end of the compared devices.

Boss VE-5, http://boss.info

Recording into the MC-101 for sampling would be done via the phone as with most of the other options.

Tascam DP-008EX

I saw this device first here where someone with a similar use case described his approach to the problem. This mixer is also a built-in recorder and features all the necessary inputs and outputs and effect. However, it is quite bulky and is at a 610g quite heavy as well. Power consumption is rated at 2.5W and thus in the upper spectrum of our devices.

Tascam DP-008EX, http://www.tascam.eu/

Recording into the MC-101 would be done via the two-step approach via the phone or tablet.

Summary

It is surpisingly hard to find a way to use the MC-101 with vocals in a live performance envionment. So the folks at Roland did an impressive job to keep us interested in their other (more expensive and heavier) gear – or stuff from other companies.

So what will I choose for my final setup? Difficult to say. But in my opinion I will either go for the Raspberry or the GO:Mixer (Pro-X) if we skip the reverb requirement. The latter has the advantage of best connectivity and low power. And especially with the GO:Mixer (instead of the GO:Mixer Pro-X) it is comparably as light as the Raspberry.

Or … I skip the MC-101 altogether and look for a single device that “does it all” (and possibly change some of my requirements) …

Hope this was helpful to you. What would you do?

The last microphone I ever buy?

In the last post I wrote about my recent purchase: The Neumann U 67. And it arrived today.

I just unpacked and connected it to my Sound Devices 833. The high-pass low-cut filter on the microphone is enabled and the polar pattern is set to cardiod.
The gain is set to 44dB on the recorder, with limiter and NoiseAssist enabled at -6dB. And this is how it sounds:

Sound Device MixPre-3 II Timecode Issue

In this post I would like to talk about an irritating feature, not to say a flaw, in the Sound Devices MixPre-3 II. You can also listen to the whole post on YouTube.

Let’s take it away.

One of the features of the SoundDevices MixPre-3 is Timecode.

However, as it turns out, there seems to be a major flaw in its implementation, that is only apparent when you change presets or use the File Transfer feature. This essentially makes the timecode unusable as it deviates by seconds within a short period of time, instead of microseconds over a course of 24h.

What do I mean by this?

Timecode on the MixPre-3 is received via the 3.5mm TRS Aux input. So in order to be able to jam from an external source you need to do the following:

  1. Go to Menu, Inputs, Aux In Mode and set it to “Timecode”.
  2. Go to Menu, Timecode, set the TC Mode to “Free Run” and select the “Jam” menu.
  3. Jam the timecode from the external source, by pressing “Jam TC”. Depending on your timecode generator, you need to select either “Aux In 1” or “Aux In 2” as the “Source”.

The timecode in the MixPre-3 should now be jammed from the external source. Note down the value, that is shown in the “Diff” line of the screen.

This all works as expected.

However, as soon as you load another preset or you switch to File Transfer mode, the timecode in the MixPre-3 starts to differ from the external source.

This can easily be verified by either doing on of the following:

Option A: Go to Menu, System, File Transfer, to enter File Transfer Mode; and select Exit to leave it. Do this several times. And then go to Menu, Timecode, Jam and note that the “Diff” value between the external source and the internal timecode generator of the MixPre-3 is now different from the value you noted down earlier.

Option B: Go to Menu, Presets and save the current settings to one of the internal presets by selecting “Save to Int 1, 2, 3 or 4”. Then select the previously saved preset by selecting Menu, Presets, Load Presets and selecting the number of the internal preset you saved earlier. Repeat thus serveral times. Go back to Menu, Timecode, Jam and note that the “Diff” value between the external source and the internal timecode generator of the MixPre-3 is now different from the value that you noted down earlier when you jammed from the external source.

Option C: Go to Menu, Inputs, Aux In Mode and select “Mic” as the source. Then via pressing the “Channel 3 knob” go to Channel 3, Input and select “Off” as the source and then go back to the home screen. Then go back to Channel 3 again and this time select “Mic”. Then go to Menu, Timecode, and select “Aux In 1” or “Aux In 2” as the source, even if the correct source seems to already be selected. After a moment, the screen updates and you should now see that the “Diff” value changed from the value you previously saw when jamming to the external source.

So what does this mean in reality?

First, this means, that you have to re-jam every time you want to transfer a file to your computer via the USB-C cable.

Second, even if you were to re-jam every time you used the File Transfer mode, you could only do this when you would not use Aux input for other purposes at all. This essentially eliminates the use of the TRS input as a microphone input that you would have in a headset such as the Beyerdynamic MMX 300.

Are there workarounds? Of course. But they all come with limitations. That is probably why they are called …

Workaround 1: SoundDevices Support suggested to use a USB stick to transfer files between the MixPre-3 and the computer.

This certainly works, but involves a lot of manual work, as you need to unplug from the MixPre, plug into the computer, transfer files, then unplug from the computer and re-plug into the MixPre again and again.

Workaround 2: Do not use timecode at all.

Really? But this removes the functionality of one of the main features of the device. Instead I could then also directly connect to the computer via a different device altogether.

Workaround 3: Do not use a microphone with a TRS jack. And re-jam every time you transfer a file.

Possible. But a lot of headsets actually happen to have such a jack.

Workaround 4: Use an XLR to TRS adapter if you have to use a microphone with a TRS jack. And re-jam every time you transfer a file.

Also possible. But then you need to carry one more adapter with you. And this changed the form factor of the MixPre-3 considerably.

Workaround 5: Go to Menu, System, USB-C and change the setting to “Power Only”.

When doing this, you cannot use your MixPre-3 when you want to play back sound from your computer. This somehow defeats the workflow to record sound on the MixPre-3 with headphones on, transfer the recording to the computer and edit it and then listen back to it with the same headphones you recorded earlier with.

With most of the workarounds we need to re-jam manually every time we transfer a file. In combination of an “auto jam” mode like on the 8-series recorders this might even be a acceptable workaround.

Sound Devices Support told me, that the out-of-sync behaviour is expected when using File Transfer mode as the device would have to sync to the computer clock. This sounds plausible. But there are two things, that do not seem to fit into the picture.

Regarding the out-of-sync behaviour there has not been any explanation at all.

First, this does not explain the behaviour that the timecode also changes when selecting presets and changing Channel settings.

Second, the Sound Device 8-series does not seem to show the out-of-sync behaviour when using File Transfer mode.

I am a little bit disappointed that depsite the richness of features of the Sound Device MixPre-3 – and the price tag that comes along with it – the device cannot deliver its features at the same time.

Hopefully, Sound Devices addresses this in a future firmware update.

Regarding firmware: the behaviour can be reproduced on a Sound Devices MixPre-3 mark II with firmware version 8.0 with build number 5136. The external timecode generator is a Tentacle Sync E connected via a 3.5mm TRS cable to the mixer. The computer used runs on Windows 11 but has shown this behaviour also with Windows 10.

Conclusion:

You cannot use the MixPre-3 reliably with timecode and as a playback device and a TRS microphone at the same time when using the File Transfer mode.

Speech synthesis with the Neumann TLM 67

As a follow to my previous post, here is the first audio from the new Descript Overdub voice recorded via the Neumann TLM 67 along with a comparison to the previous overdub voices I recorded.

Descript speech synthesis 44.1kHz @ 16bit

Here is the uncompressed audio, in case you want to find out if you can hear a difference:

Descript speech synthesis 48kHz @ 24bit

In addition, I recorded a section for Librivox (in german), in case you want to hear more audio:

Wilhelm Busch, Volksmärchen, Die Zwei Brüder, 44.1kHZ @ 16bit 128kbp CBR MP3